Chapter 6 Making measurements and comparisons
In addition to being a good program for visualizing biomolecules, YASARA can also be a tool to analyze biomolecule structure. In the free version the analysis capabilities are limited, however for most biomolecules, these simple tools are sufficient.
6.1 Making Selections
All analytical methods in YASARA require a definition of the Obj/Mol/Res/Atoms involved. Selections can be made using the mouse as described in Table 4.1 or using the Select command in the menu or command line. Once a selection has been made with the mouse you will see “fireflies” (6.1) around the atom selected.
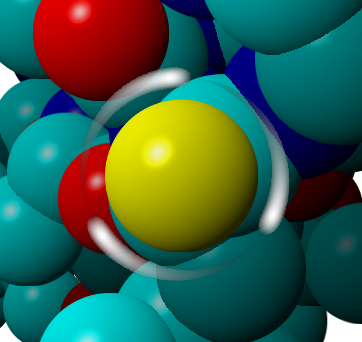
Figure 6.1: A selected atom surrounded by fireflies shown as white streaks
In contrast, selections made using the Select command will become highlighted with in a universe style (6.2).
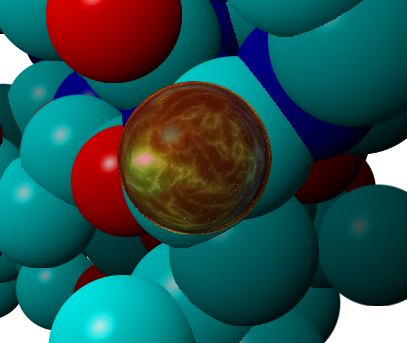
Figure 6.2: A selected atom with the universe style. It’s Full of Stars
By far, the easier way to make single selections is using the mouse. However, when making selections of groups such as all the alanine residues or multiple selections, then you will need the menu (2.4.4) or command line (6.1.1.4).
6.1.1 Making multiple selections
6.1.1.1 Using the Mouse
To select multiple atoms using the mouse, hold down the CTRL key while left clicking the target atoms. As each atom is selected a new set of fireflies will appear around the atom. The first atom will always have white fireflies while the subsequent selections will have red, green, or blue fireflies. Red fireflies always designate the last atom selected. This method of selecting atoms is how we will make measurements of distance (6.2) and angles (@ref(#mangle)).
6.1.1.3 Unselect
In addition to the Select command, there is an UnSelect command which is good for clearing selections or removing certain elements from your selection. Typically I only use UnSelectAll. However, UnSelect combined with Obj/Mol/Res/Atom option can be useful in macros (??) and movies (7) for creating interesting styles and views of the molecule.
6.1.1.4 Using Select from the command line
Select from the command line involves using Select in combination with a level of organization followed by a selection. This method is fast and precise in addition to being useful for manipulation and styling scenes quickly.
You can also add on qualifiers to select such as with distance <5 from Res 10 which would select all the amino acids within 5 \(\unicode{x212B}\) of amino acid 10 in the protein. Also you can use ! to mean not. The command !lys would refer to everything except the lysine amino acids in the scene.
# Load a PDB file
>LoadPDB 1crn, download=yes

# Select all the alanine residues in the protein
>SelectRes ala

# Select amino acids 1-10 inclusive
>SelectRes 1-10

# Select molecule A
>SelectMol A

# Select amino acids within 4 angstroms of amino acid 10
>SelectRes all with distance <4

# Select all amino acids except alanine
>SelectRes !ala
6.1.2 How to manipulate selections
Once a selection has been made using the various methods above, what can you do with that? Selections like Obj or Res can be referred to in commands to produce analysis or changes to the scene. Previously if we wanted to change the style of an amino acid to ball and stick we typed BallStickRes followed by the amino acid number or name. Now we can insert selected in for the amino acid name or number as shown in the code chunk below. While this seems redundant, if you have a complex set of amino acids that you are interested in. Typing that list for every command would be tedious. Instead, Select those amino acids and then refer that selection. This trick can save you a lot of time.
# Load a PDB file
>LoadPDB 1crn, download=yes

# Select all the alanine residues in the protein
>SelectRes ala

# Change the style of all the alanines to ball and stick
>BallStickRes selected

# Color the alanines red
>ColorRes selected, red

# Show an individual surface around each of the alanines
>ShowSurfRes Selected,Type=Molecular,OutCol=Blue,OutAlpha=50,Specular=Yes
6.2 Measuring Distance
The interval between atoms is crucial for understanding strong and weak interactions in chemistry and biology7. In YASARA the command to measure this interval is Distance but you can also use the menu system or the mouse. This latter method is by far the easiest.
Using the mouse:
Left-click on the first atom and then hold down the CTRL key and left-click on the second atom. Fireflies will appear around both selections and the distance will appear under Marked Distance in the HUD (2.1). The units of distance are \(\unicode{x212B}\) or Angstrom, which is equal to 10-10 meters.
Using the menu:
Analyze>Geometry>Distance, then select the two atoms you are want to measure the interval between. There is an option to include only the distance between atoms that are directly connected, however this is not useful in most cases.
Using the command line:
# Load a PDB file
>LoadPDB 1crn, download=yes

# Measure the distance between the Oxygen in the side chain of Threonine 2
# and the nitrogen in the side chain of Arginine 10
>Distance 13,69,bound=No
# Output from YASARA in the console
Distance  13  OG1 THR    2    -  69  NH1 ARG   10   :     2.897 A
In most cases, using the mouse is more than sufficient unless you want to use a Macro to analyse the distances of a large number of atoms.
6.2.1 Labeling distances
For annotating distances for a figure, you would use the command LabelDis or choose to label a distance in the label menu (see section 5.2 for more details on annotating scenes with labels). I will only desribe the command line method here with the results of the command shown in Figure 6.3. As with text labels, when labeling the distance you need to specify the text to show (format), the size (height), color (color), and the coordinates of the label relative to the center of the gap between the atoms. As with the Distance, you need to specify the atoms to measure between and bound.
# Load a PDB file
>LoadPDB 1crn, download=yes

# Measure the distance between the Oxygen in the side chain of Threonine 2
# and the nitrogen in the side chain of Arginine 10 and add a label
>LabelDis 13,69,Format=DIS,Height=0.7,Color=Black,X=0.0,Y=0.0,Z=0.0,bound=No

#Orient the scene to show the label
>PosOriObj 01, X=0.000, Y=0.000, Z=35.192, Alpha=31.934, Beta=292.437, Gamma=-9.577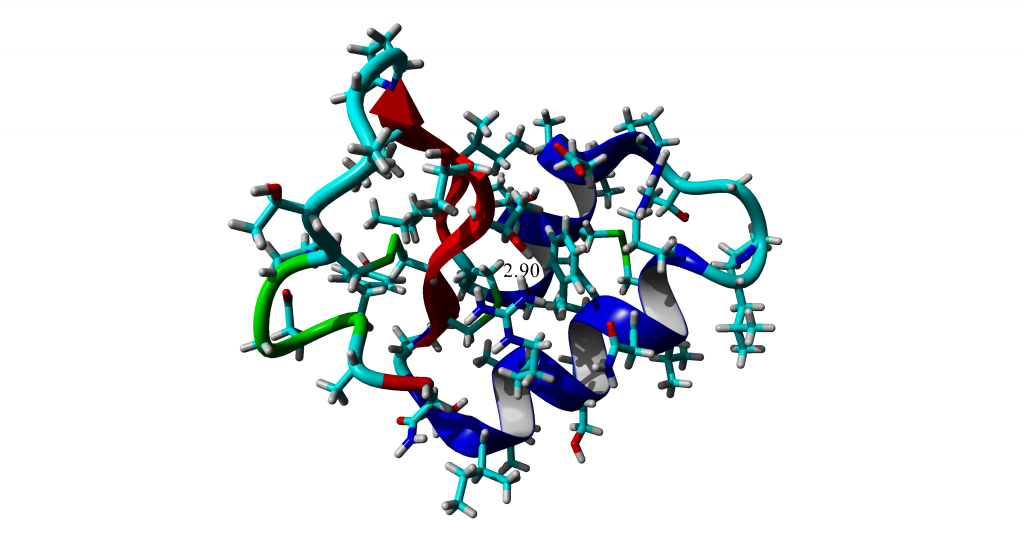
Figure 6.3: Annotated distance between Threonine 2 and Arginine 10
6.3 Measuring Angles
Angles refers to the distance between two intersecting bonds or imaginary lines between three Obj/Mol/Res/Atom. Like Distance, there are three methods to calculate this value, however three Obj/Mol/Res/Atoms are needed rather than two. I do not use the Angle command frequently except to check that bond angles are accurate when building models.
Using the mouse:
Left-click on the first atom and then hold down the CTRL key and left-click on the second, third atoms. Fireflies will appear around all selections and the angle will appear under Marked Angle along with the distance between the first two selections under Marked Distance in the HUD (2.1). The units of angle are \(\circ\) or degrees.
Using the menu:
Analyze>Geometry>Angle, then select the three atoms you are want to measure the angle between There is an option to include only the distance between atoms that are directly connected, however this is not useful in most cases.
Using the command line:
# Load a PDB file
>LoadPDB 1crn, download=yes

# Measure the angle between the Oxygen in the side chain of Threonine 2
# and the nitrogen in the side chain of Arginine 10 and the carbon in the sidechain
>Angle 68,69,13,bound=No
# Output from YASARA in the console
Angle  68  CZ  ARG   10    -  69  NH1 ARG   10    -  13  OG1 THR    2   :  124.870
There is no way to label an angle in YASARA at this point in time, however it would be possible to show using a regular label as described in the section on labeling (5.2).
6.4 Measurings Dihedrals
The Dihedral angle is the angle between two planes created by two attached atoms and therefore involves 4 atoms. The most common dihedral angles to measure in proteins are the Ramachandran Angles. There are a limited number of stable dihedral angles in biomolecules due to steric clashes, therefore an easy way to check a protein structure is to measure the dihedral angles. To measure dihedral angle requires 4 atom selections.
Using the mouse:
Left-click on the first atom and then hold down the CTRL key and left-click on the second, third, and fourth atoms. Fireflies will appear around all selections and the dihedral angle will appear under Marked Dihedral and the angle of the first, third, and fourth atoms under Marked Angle along with the distance between the firsth and fourth selections under Marked Distance in the HUD (2.1). The units of the dihedral angle are \(\circ\) or degrees.
Using the menu:
Analyze>Geometry>Dihedral, then select the four atoms you are want to measure the angle between. There is an option to include only the distance between atoms that are directly connected, however this is not useful in most cases.
Using the command line:
# Load a PDB file
>LoadPDB 1crn, download=yes

# Measure the dihedral angle beta carbon, alpha carbon, carbonyl carbon, and carbonyl
# oxygen of Arginine 10. This is also the Phi angle for this amino acid.
>Dihedral 64,61,62,63,bound=No
# Output from YASARA in the console
Dihedral  64  CB  ARG   10    -  61  CA  ARG   10    -  62  C   ARG   10    -  63  O   ARG   10   :  -99.067
There is no way to label a dihedral angle in YASARA at this point in time, however it would be possible to show using a regular label as described in the section on labeling (5.2).
6.5 Counting Atoms/Residues
The Count command is for quickly counting the number of Obj/Mol/Res/Atoms or bonds in a scene. This command can also be mixed to determine the number of Res/atoms in all of certain Obj/Mol/Res or within a selection.
Using the menu:
Analyze>Count, then select Obj/Mol/Res/Atom or bond. In the menus, then make your selection. I recommend using the Name or Belonds to or has boxes in most cases (see Section 2.4.4 for more details).
Using the command line:
The primary command is Count followed by Obl/Mol/Res/Atom/Bond and a selection. The number of things that match that selection will be shown in the console.
# Load a PDB file
>LoadPDB 1crn, download=yes

# Count the cysteines in the protein
>CountRes cys

# Count the atoms in the scene
>CountAtom all
# or
>CountAtom Obj 1

# Count the atoms in the cysteines
>CountAtom Res Cys

# Count the atoms in the backbone of the cysteine
>CountAtom Res Cys backbone
6.6 Alignment
When trying to understand the function of biomolecules it is often useful to compare the structure of the two molecules after alignment. There are two functions to align Obj/Mols in YASARA, Superpose (Sup) and Align. Each has its own unique style. Sup aligns molecules using sequence while Align uses structure. The end result of either action should be two or more Obj/Mols shown on top of each other along with a measure of the similarity called the Root Mean Square Deviation (RMSD) which is described more in the next section (6.6.2). In general, Align is the better option to use, but Sup can often work when Align fails.
To superpose two or more objects/molecules from the menu:
Analyze>Superpose>then pick whether you want to superpose on a selection (most common) or on the ordered regions. I recommend using SearchDoc to get more details on Sup if you need them. If you choose Superpose>individual objects on selected, you will then be asked to select the Obj/Mol as we have seen before in selection menus (2.4.4) followed by a set of parameters. Here you will choose what properties must match for the superposition to occur. If you have distinct sequences, then atom name may be the only match, more similar sequences you can probably include residue name and number. Because some bonds can rotate, an additional option is to flip chemically equivalent groups. This parameter is especially useful when you are comparing distinct structures of the same protein. Finally, you can have YASARA return RMSD value per Obj, Mol, Residue or Atom. For distinct proteins, choose Obj or Mol, for similar proteins choose Residue or Atom.
To align two or more objects/molecules from the menu:
Analyze>Align>then pick your method pairwise based on sequence or structure, or multiple based on structure. Once, you pick your method you will be asked to select the Obj/Mol to align using the selection menus (2.4.4). If doing pairwise, only pick one Obj/Mol per menu, if doing multiple, then you can pick many structures in the first menu followed by the target of the alignment in the second menu.
To align or superpose using the command line:
# Load two PDB files
>LoadPDB 1ubq, download=yes
>LoaDPDB 5ia7, download=yes

# Superpose 5ia7 (Obj 2) on 1ubq (Obj 1) and return RMSD values of the Obj
>SupObj 2,1,Match=AtomName,Flip=No,Unit=Obj
# Console output
Object  2 (5ia7) and Object  1 (1ubq) have 13.5494 A RMSD over 163 matched atoms

# Align 5ia7 (Obj 2) on 1ubq (Obj 1) and return RMSD values
>AlignObj 2,1,Method=MUSTANGPP
# Console output
Single line alignment:
>Object 1 (1ubq):
MQIFVKTL-----TGKTITLEVEPSDTIENVKAKIQDKEGIPPDQQRLI-----FAGKQLEDGRTLSDY------NIQKESTLHLV--------------------------------------------------------------------------------LRLRGG
>Object 2 (5ia7):
VSFKITLTSDPRL--PYKVLSVPESTPFTAVLKFAAEEFKVPAATSAIITNDGI----GINPAQTAGNVFLKHGS------ELRII|VSFKITLTSDPRLPYKVLSVPESTPFTAVLKFAAEEFKVPAATSAIITNDGIGINPAQTAGNVFLKHGSELRIIPRDRV------

Multi line alignment of object 1 (1ubq,Query) and object 2 (5ia7,Hit):

Query:    1 MQIFVKTLTG-----KTITLEVEPSDTIENVKAKIQDKEGIPPDQQRLIFAGK-----QLEDGRTLSDYNIQKES------TLHLVLRLRGG-------------------------------------------------------------------------------- 77
            ::: |             :L:V  S  :  V     |:  |P   : |I          |: ::T ::              L:||
Hit  :    1 VSFKITLT--SDPRLPYKVLSVPESTPFTAVLKFAAEEFKVPAATSAII----TNDGIGINPAQTAGNV------FLKHGSELRII------|VSFKITLTSDPRLPYKVLSVPESTPFTAVLKFAAEEFKVPAATSAIITNDGIGINPAQTAGNVFLKHGSELRIIPRDRV 154


The above structural alignment between objects  2 (5ia7) and  1 (1ubq) has an RMSD of 1.629 A over 58 aligned residues with 13.79% sequence identity.
Align provides a sequence alignment of the protein in the console in addition to the RMSD value. The query is the second molecule in the command, the Hit is the first molecule. Between the two lines are either a gap, an amino acid in one letter code, a : or a |. The : indicates similar amino acid based side/charge, | means near identity, and if a letter is shown it means that the amino acid is conserved or the same in that position in both molecules.
As noted above, Align is a more robust method, provides more information, and is simpler to do, however it does not always work, especially for structurally divergent molecules or for very large complex biomolecules.
6.6.1 Why did my Obj/Mol move (or not)?
When aligning or superposing Obj/Mol, one or more of the Obj/Mols will move on top of another Obj/Mol. At first, this change in the scene can appear confusing and/or frustrating. When setting up an alignment, whatever Obj/Mol(s) is/are listed first will move, while the “target” molecule will remain fixed on the screen. In practice, always have the biomolecule which is better established or which has the longer sequence be the target of the alignment. If molecules disappear you can use the center button in the top row menu (2.4.2) to bring all the molecules back on the screen.
6.6.2 Root Mean Square Deviation
The RMSD provides a measure of the average difference in distance between atoms within two or more molecules. The more closely the structures match, the lower the RMSD value8. If you align one or more molecules using Align or Sup this value is provided in the console. You can also calculate RMSD without aligning using the RMSD command followed by Obj/Mol/Res/Atom. This command is useful for calculating the RMSD of pieces of aligned molecules. The RMSD command is found in the Analyze menu and uses a selection menu system as described before (2.4.4).
6.7 Making amino acid or nucleotide substitutions
A frequent goal of biochemistry is to understand biomolecule structure and function. Along the path to this goal, biochemists often like to make substitutions within the sequence of DNA/RNA or proteins to determine how this change alters the structure and function of the biomolecule. YASARA can show simple changes to biomolecule structure using the Swap command which, when combined with energy minimization, molecular dynamics, or experimental data, can explain the structural basis for defects in protein function.
One caution when using YASARA_view_, Swap simply inserts the amino acid/nucleotide and does not optimize the interactions or any parameters of the changed molecule. Thus, any data associated with ‘Swap’ should be considered with skepticism in the absence of confirmatory evidence.
Using the menu:
Edit>Swap>then select Obj/Mol/Res/Atom or bond. In the next menu, pick your amino acid or nucleotide to change and click OK. In the next menu, choose what to change your selection to. In humans and other living, use L-amino acids. You can initially select multiple amino acids to change, but can only choose one type of amino to change those amino acids/nucleotides to.
Using the pop-up menu:
Select an atom by left-clicking the mouse, then right-click that selected atom. In the pop-up menu, there is the Swap command, which can then be followed as above to change that particular amino acid/nucleotide.
Using the command line:
# Load a PDB file
>LoadPDB 1crn, download=yes

# Change Cys 16 in the molecule to Arginine
>SwapRes Cys 16, Arg

# Change all the Asn to Asp
>SwapRes Asn, Asp
6.7.1 Swapping bonds
During model building of enzymes, it is often useful to build intermediates or transition states of the reactants in order to predict the enzyme active site might interact with these structures. Like for amino acids and nucleotides, Swap can be used to change a double bond into a single bond or other combinations to build these intermediates. Like residue substitution, these changes to bonding are not optimized and should be interpreted cautiously.
6.8 Knowledge Checks9
Load the PDB file 148L and count the number of water molecules around the protein. The residue code for water is hoh.
Select and count the amino acids within the active site of the protein that are within 3 \(\unicode{x212B}\) of Mol S. You will likely need to exclude the waters for this, either by deleting the waters or by being very precise in your selection commands.
See the section on Chemical Bonds in Biochemistry described within 5th edition of Biochemistry by JM Berg, JL Tymoczko, and L Stryer.↩
more information on RMSD and on programs to calculate RMSD with biomolecules↩